Category Archives: Uncategorized

Hosting a Minecraft Server

We decided to try out minecraft as a family. Our setup includes a half dozen devices (some iOS, some android, Xbox one, etc) with users spread out across the country.

Rather than pay for a realms subscription, we chose to host our own server. Besides being cheaper this gives us flexibility and control over the world data.

Server Setup

Run the docker container (we used the Bedrock Minecraft Server):

docker run -d -e EULA=TRUE --name cworld -e GAMEMODE=creative -e DIFFICULTY=normal -e SERVER_NAME=fenhome2 -v /home/<user>/data:/data  -p 127.0.0.1:19132:19132/udp itzg/minecraft-bedrock-server

Note 1 – I purposefully run the minecraft server only the localhost – not on the public IP. More on this later.

Note 2 – I specify a volume for the data. This lets you preserve minecraft state across server restarts and allows you to port it to other servers easily. Replace <user> with your username on your server.

For the sake of security we would like to allow access to only the clients that we specifically want to allow. To do this I found the easiest thing is to use one firewall-cmd per allowed host:

firewall-cmd --direct --add-rule ipv4 nat PREROUTING 0 -s <allowedHostIp>/32 -p udp --dport 19132 -j DNAT --to-destination  <dockerIp>:19132

Substitute the ip of the allowed host in place of <allowedHostIp>. To find your ip just go to http://whatismyip.com. The <dockerIp> can be found with the following command: docker exec -it cworld ip addr | grep 172

Connecting Android/iOS Clients

Its really easy to connect Android and iOS clients. Just click on the servers tab (shown here):

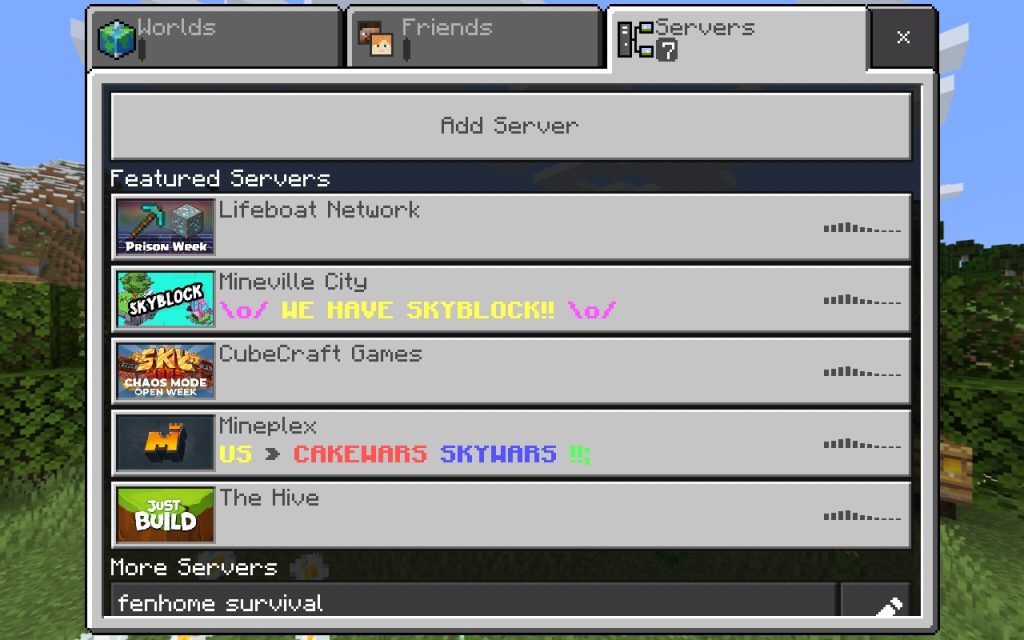
Then click on the “Add Server” button.

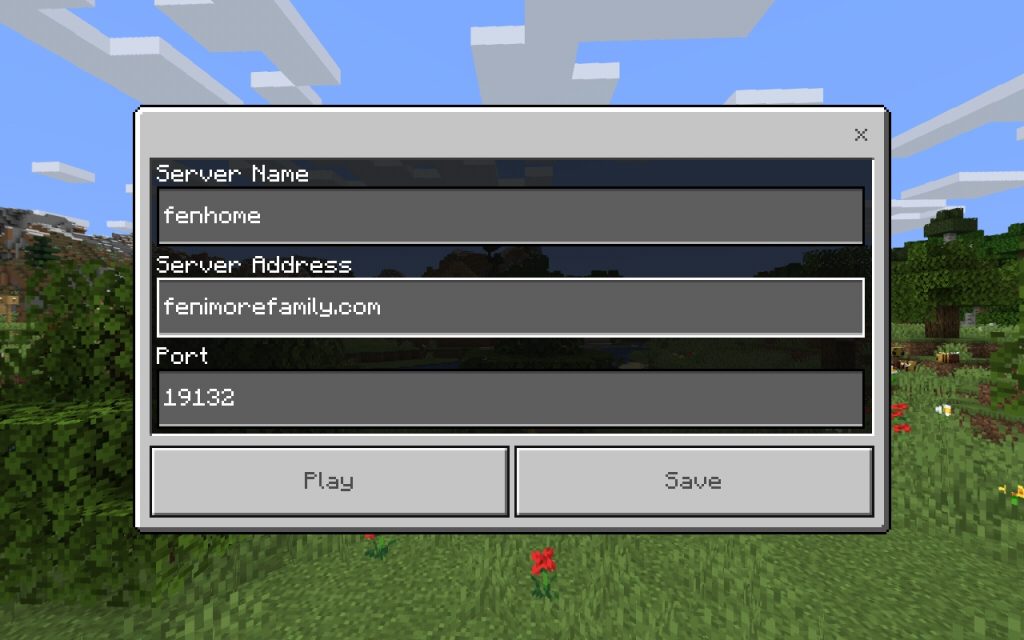
You will fill in the server name with whatever you want, however the hostname and port will be the hostname of your server and port (19132 in this example). See this example:

Connecting XBox One Clients

XBox clients are more challenging than Android/iOS because they don’t have the “Add Server” button. However there is still a way to make it work! The magic involves adding a “network proxy” on your network that tricks the XBox into thinking there is a local server. The XBox connects to this proxy which forwards traffic to your server.

  1. Download phantom from https://github.com/jhead/phantom
  2. Inside your phantom checkout run make
  3. Copy phantom_windows.exe to your windows box.
  4. On your windows box type: cmd
  5. In your console type cd <path to downloaded phantom-windows.exe">
  6. Type phantom-windows.exe -server <server>:19132
  7. If prompted by windows to allow phantom through your firewall say “yes.”

IMPORTANT: You will need to ensure phantom is running for the duration of your game play.

If you trust me (why would you?!) you can use the copy of phantom I built (md5 5e7595f82f117b545c511629df3304ba)

Add a Second Server for Survival Mode

If you want to start a second server for survival mode games the process is almost identical. The docker image is created as follows:

docker run -d -e EULA=TRUE --name cworld_survival -e GAMEMODE=survival -e DIFFICULTY=normal -e SERVER_NAME=fenhome2_survival -v /home/<user>/data_survival:/data  -p 127.0.0.1:19133:19132/udp itzg/minecraft-bedrock-server

And for the firewall

firewall-cmd --direct --add-rule ipv4 nat PREROUTING 0 -s <allowedHostIp>/32 -p udp --dport 19133 -j DNAT --to-destination  <dockerIp2>:19132

Where <dockerIp2> is the IP of the second minecraft server.

You can now add a second server in your android/iOS clients with the name “<server> survival”, <server> for the ip, and 19133 for the port.

Note that on XBox you will need a second phantom instance with 19133 as the port, as in:

phantom-windows.exe -server <server>:19133

Installing pytorch/torchvision on centos7

The installation command shown on pytorch.org didn’t quite work for me on centos7. Instead of using the anaconda installer provided on pytorch, I just used the yum-provided conda:

yum install conda

However when i went to run the command as specified I got the following error:

~$ conda install pytorch torchvision cudatoolkit=10.0 -c pytorch

NoBaseEnvironmentError: This conda installation has no default base environment. Use
'conda create' to create new environments and 'conda activate' to
activate environments.

It seems the problem is that pytorch is assuming you’ve set up a working conda environment – which i had not. You can work around this by simply naming the environment (I suppose you could also have made a base environemnt, but I decided to save that adventure for another day). The following did work for me:

conda create -n pytorch pytorch torchvision matplotlib cudatoolkit=10.0 -c pytorch

Note I also added matplotlib as I was following pytorch examples that requires it. Also, I found I could run any pytorch example by directly referencing the conda environment, instead of activating it and then running the script, as follows:

~/.conda/envs/pytorch/bin/python3.7 train.py

Setting up GPG/qtpass/pwgen for windows

This is a predicate for a distributed password management system. At the end of this exercise you have a secure password manager for one device, but with a small step or two the full solution can be implemented.

  1. Download and install GPG; At least install kleopatra, as this will give you a nice GUI for generating you keys.
  2. Generate a new keypair. Open kleopatra, click on file -> new key pair. Select “Create a personal OpenPGP pair.” Fill in your name (first and last) and email. Click on advanced. Select 4096 bits. Ensure you publish your key so you can do other fun things, like send encrypted email.
  3. Download and install qtpass.
  4. Configure qtpass. Click on users. Select the user you generated a key for earlier. Close the dialog. Exit qtpass. Relaunch it. Select config. I recommend the following:
    • On-demand copy to clipboard. Hide after 10 seconds.
    • Check hide password. Check autoclear, after 10 seconds
    • Password length. Try 20 characters. Some sites won’t use all 20, so youll need to shorten it for them, but most sites do let you go long.
    • Use tray icon.
    • Start minimized
    • Click on programs, set the path to gpg: You can browse to it, but it should be “C:/program files (x86)/GnuPG/bin/gpg.exe”.

At this point, it would be good to create a few folders. The nice thing to note is you don’t have to use qtpass for this – it can be a bit squirrley, Just open a command line prompt and cd into “password-store” – you can do “mkdir ” to create a new directory.

Try adding a new password under a folder – it should let you enter the login name, click on “generate password”, and when you save it should show the password under your folder.

Next step is to add git support, and create a secure git repo on a website. Then you’ll basically have a custom, secure, distributed password store!

The Wonder Of Open Source And Web Development

I am not a web developer. Notwithstanding this fact I have been doing web development almost every year for the past two decades. This has helped me see a recurring trend: every year I find that all the things I hated about web development have been replaced by new and exciting things. These exciting things keep their glittery shine for about six months, tarnish, wither, and become hated. I then retire from web development forever (meaning: until the following year.)

Currently I am in the honeymoon phase with React. This is after a brief love affair with Angular. I think my relationship with React will last longer because it is just so much cooler than Angular… (nevermind when my ex says “that’s what you said about me after you ditched jQuery!” Everyone knows its impossible to ditch jQuery)

The other thing of note is how many stinkin’ development tools are born every year. I was just brushing up on open source ecommerce offerings last week and stumbled upon a dozen or so. Widdling this down by filtering out inactive projects (based on github commit graphs), I found a few that seemed like good candidates. Of course this led me to some of the underlying frameworks supporting these products: composer (php – ihk; I loathe anything relating to php), meteor, electrode (from walmart labs of all places!), hapi.js, etc. What are all these heretofore-unknown-but-now-pivitol-groundbreaking frameworks?

It never ceases to amaze me how much time is spent on doing, then re-doing frameworks and toolkits. Could we solve the worlds shortage of developer problem by passing some law to limit needless duplication of efforts in creating frameworks? Maybe if we linked excess framework creation to carbon emissions Bernie sanders could jump in and help.

Perhaps toolkits and frameworks are the only fitting artifacts that a developer can leave behind for posterity. All the application code written is usually for a company, and therefore kept closed source, will likely never see the light of day. What does any good developer do besides create abstractions?

As an aside I also found it amusing to see a similar trend with amazon – no longer just s3 and ec2, they have all kinds of petabyte scale storage (including one offering that involves driving a semi truck to your business to extract up to 100 petabytes of data), lambda, snowball, blah blah, etc. Not open source, but in the same vein of neverending innovation…

Random Opinions of MATLAB

While working on my Masters at BYU I had a professor that did all his demonstrations in MATLAB. It was as if nobody had told him that they had invented other languages. Or he just really loved MATLAB.

Lately I’ve been doing a project where I’ve had to experience the joy of using MATLAB. As a numerical processing suite it definitely effective: concise, quick, easy. It is also quirky. I thought I’d log a few observations for posterity.

First, the editor has some nice things: autocomplete, lots of suggestions for writing more idiomatic MATLAB. For example:

  • number conversion – i was tempted to use str2num, which does work, but MATLAB suggested str2double, which also works but is mo’ betta
  • string finding – Of course there is a findstr and strfind… you guess which one MATLAB prefers. The MATLAB will correct you. (hint: its strfind)
  • printing – My very first transgression was trying to log statements using disp(sprintf(‘stuff: %s))… For some reason i found sprintf but didn’t yet know that disp(sprintf()) is analogous to fprintf()… but MATLAB wasn’t afraid to correct me

Matlab has a ton of quirks:

  • The editor is SOOO WEIRD. Examples: weird key combos for copy and paste… seriously, Alt+2?? Where are my vim bindings?
  • Performance of deeply nested classes. Deeply meaning depth > 1. I wrote a file reader class. The reader had a data member that allocated a large array. Performance went in the gutter. Then I moved the array to the same level as the file reader, keeping all logic the same, and performance was better. Why oh why would it matter. I don’t know, but it does.
  • Weird behavior when return value not specified. I realized c++ does this. If you don’t specify a return on a non-void function, bad things can happen. I’d expect more from a (presumably) high-level language like MATLAB.
  • paths. I think the notion of having code paths is weird. Why not just have a project with all the paths set up?

Except for the editor, which is appalling, I actually find MATLAB quite usable. I wouldn’t claim it is superior to python, just different.

How to get an ovpn file onto iOS device via HTTP

Recently I wanted to get a VPN connection from a phone to an openvpn server. The openvpn app only provides two or three options for getting your ovpn file: 1) use itunes, 2) go to a website in safari that has the .ovpn file, or 3) send via mail.

Option 1 was out since the phone was locked down enough to not permit me to transfer apps. Not sure why – likely just a policy of the phone (i dont own the phone).

Option 3 is less secure so I skipped that.

Option 2 is easy – I only had to make a few mods off what I found via Mr. Google:

  • Make the .ovpn file have a unified format. Some places on the internet suggested you could have configuraiton lines that looked like the following:
    ca [inline]
    cert [inline]
    key [inline]
    

    However this doesn’t actually work. Instead, just delete those lines and stuff the ca, cert, key, and tls keys under the appropriate tags (they have the same name as the config lines)

  • Ensure your web server has the right mime type. The .ovpn mime type is “application/x-openvpn-profile”, and can be added to your httpd.conf like this:


    <IfModule mime_module>
    ...
    AddType application/x-openvpn-profile .ovpn
    ...

I then pointed my browser at the .ovpn file, at which point safari recognizes that you can open it in openvpn. All worked marvellously thereafter.

Measuring raspberry pi performance

I initially had high hopes for the raspberry pi 3 and snapped up three of them. I hoped to see one take the place of my media center, another two for monitoring tasks. Unfortunately I became less than enthused about the pi for a media center as it has no good way to stream of youtube or vidangel. Additionally it couldn’t keep up with streaming some HD videos.

It has now been a few months since my initial disappointment and I decided to try out the new firmware and see if things got better.

The first tests i ran were using iperf. One raspberry pi, rpi1, was left behind at the old firmware. Another pi, rpi2, was upgraded to the latest.

Firmware Kernel
rpi1 1b7da52ec944a9e1691745036966b3b2a48b19e8b (Apr 7 2016) 4.1.21-v7+
rpi2 1e7b8e2c9a7319f7b22869f1334c66e2cfc99f4a (Jun 27 2016) 4.4.14-v7+

Initial iperf test (iperf client running on my macbook, server on each raspberry pi – tests were run independently, on one raspberry pi at a time):

RunRpi1 Rpi2
128 Mbits/sec 39 Mbits/sec
231 Mbits/sec 37 Mbits/sec
330 Mbits/sec 39 Mbits/sec
430 Mbits/sec 38 Mbits/sec

I also tried this with a parallel iperf test (iperf -c -P 10)

RunRpi1 Rpi2
130 Mbits/sec 34 Mbits/sec
229 Mbits/sec 38 Mbits/sec
329 Mbits/sec 35 Mbits/sec
429 Mbits/sec 35 Mbits/sec

I also wanted to test sustained (iperf -c -t <10,120>)

Duration (seconds) Rpi1 Rpi2
10 29 Mbits/sec 39 Mbits/sec
120 29 Mbits/sec 35 Mbits/sec

Even on a udp iperf test (-u on the server, -b 50m on client) rpi1 gets 32 Mbits/sec, rpi2 gets about 39 Mbits/sec. In all cases there is a 5-9 Mbits/sec average higher increase with the new firmware. Pretty significant!

Note that if I run these same tests where my macbook is the client but a virtual machine on my network is the server, I see transfer rates in the 500 Mbit/sec range (the -P 10 test gave 513 Mbits/sec and the UDP test -b 1000m gave 627 Mbit/sec). This at least demonstrates that my infrastructure is more than capable of higher transfer rates. Thank goodness for 802.11ac routers!

It is also worth noting a few differences between the pi and vm tests. One difference is that the virtual machine is on a direct-cabled server, whereas both the raspberry pi and macbook are on wireless. Thus for the VM test, only one traversal of wifi is needed, whereas macbook to pi tests involve two traversals.

Now, if I upgrade rpi1 I would expect the numbers to be equal. Right…?

Strangely, no. Even after the upgrade I see rates in the 30Mbits/sec for rpi1. Digging deeper I found one minor discrepency between the two – i set aside 256 MB for gpu ram on rpi1, but only 128 MB on rpi2. Even after switching rpi1 to 128 MB, I still see the same numbers on both. I noticed I had a wireless keyboard adapter on the slower pi – but removing it didnt affect the transfer rates.

Another difference is that there is a raspberry pi camera on the faster pi – it would be interesting to see if that affects things.

I tried testing the ethernet interfaces and found performance across the pis identical.

At the moment I’m not sure how to account for the roughly 25% higher wifi performance on one pi over the other.

A Tasty Apple Pie Recipe

Having a bushel or two of apples on hand, I decided to make an apple pie the whole family could enjoy.  I borrowed two recipes.  For posterity i have included the actual recipe in addition to the links.

For the apple pie guts I used Apple Pie by Grandma Ople:

1 recipe pastry for a 9 inch double crust pie
1/2 cup unsalted butter
3 tablespoons all-purpose flour
1/4 cup water

1/2 cup white sugar
1/2 cup packed brown sugar
8 Granny Smith apples – peeled, cored and sliced
Directions
Preheat oven to 425 degrees F (220 degrees C). Melt the butter in a saucepan. Stir in flour to form a paste. Add water, white sugar and brown sugar, and bring to a boil. Reduce temperature and let simmer.
Place the bottom crust in your pan. Fill with apples, mounded slightly. Cover with a lattice work crust. Gently pour the sugar and butter liquid over the crust. Pour slowly so that it does not run off.
Bake 15 minutes in the preheated oven. Reduce the temperature to 350 degrees F (175 degrees C). Continue baking for 35 to 45 minutes, until apples are soft.

and for the crust I used French Pastry Recipe:

Ingredients
3 cups all-purpose flour
1 1/2 teaspoons salt
3 tablespoons white sugar
1 cup shortening

1 egg
1 teaspoon distilled white vinegar
5 tablespoons water
Directions
In a large mixing bowl, combine flour, salt, and sugar. Mix well, then cut in shortening until mixture resembles coarse meal.
In a small bowl, combine egg, vinegar, and 4 tablespoons of water. Whisk together, then add gradually to flour mixture, stirring with a fork. Mix until dough forms a ball. Add one more tablespoon of water if necessary.
Allow dough to rest in refrigerator 10 minutes before rolling out.

The results we’re fantabulous:

P1060846

Using raspberry pi for two-way video/audio streaming

I am currently writing custom software to create a variety of distributed media solutions.  One of these involves a raspberry-pi security camera.  Right now my software isn’t finished, but I wanted to prove the concept out using existing software.  System requirements:

Raspberry pi:

  • Broadcast audio (over the LAN) to a server
  • Broadcast video (over the LAN) to a server
  • Receive (and play over the speaker) audio

Laptop:

  • Receive audio/video from the raspberry pi (and display it)
  • Send audio (from the laptop’s own microphone) to the pi.

I bought a raspberry pi b+, cheapo USB microphone, and IR camera (with built-in LEDs), and some speakers.  The whole package was around $100, which is just plain awesome.  Im sure my grandkids will marvel, 40 years down the road, that for the cost of an Obama-approved school lunch, I could buy so much.

Here’s a schematic of the setup:

design

This can be accomplished with a few scripts, which i based heavily on those found here: http://blog.tkjelectronics.dk/2013/06/how-to-stream-video-and-audio-from-a-raspberry-pi-with-no-latency/

Run the following on the pi:

function on_signal (){
    launch "kill -9 $piVideoPid $piAudioPid $osxAudioPid"
}
trap 'on_signal' EXIT

# Receive os x audio
gst-launch-1.0 -v udpsrc port=9102 caps=\"application/x-rtp\" ! queue ! rtppcmudepay ! mulawdec ! audioconvert ! alsasink device=plughw:ALSA sync=false &amp;
osxAudioPid=$!

# Send pi audio
gst-launch-1.0 -v alsasrc device=plughw:Device  ! mulawenc ! rtppcmupay ! udpsink host=$broadcastIp port=$piAudioPort &amp;
piAudioPid=$!

# Send pi video
raspivid -t 999999 -w 1080 -h 720 -fps 25 -hf -b 2000000 -o - |  gst-launch-1.0 -v fdsrc ! h264parse ! rtph264pay config-interval=1 pt=96  ! gdppay ! tcpserversink host=$localIp port=$piVideoPort

Run the following on the laptop (a macbook in my case).  Note if this were a linux box you would probably use “autoaudiosrc”.

function on_signal (){
    launch "kill -9 $piVideoPid $piAudioPid $osxStreamPid"
}
trap 'on_signal' EXIT

piIp=&lt;raspberryPiIp&gt;

# Stream OSX microphone (note the capsfilter, apparently needed due to os x bug)
launch "gst-launch-1.0 -v osxaudiosrc ! capsfilter caps=audio/x-raw,rate=44100 ! audioconvert ! audioresample ! mulawenc ! rtppcmupay ! udpsink host=$broadcastIp port=$macAudioPort" "ASYNC"
osxStreamPid=$!

# Receive audio
launch "gst-launch-1.0 -v udpsrc port=$piAudioPort caps="application/x-rtp" ! queue ! rtppcmudepay ! mulawdec ! audioconvert ! osxaudiosink" "ASYNC"
piAudioPid=$!

# Receive video
launch "gst-launch-1.0 -v tcpclientsrc host=$piIp  port=$piVideoPort ! gdpdepay ! rtph264depay ! avdec_h264 ! videoconvert ! autovideosink sync=false" "ASYNC"
piVideoPid=$!

echo "Waiting on $piVideoPid $piAudioPid $osxStreamPid"
wait

You should be able to see and talk to whoever is on the other end of the pi. Biggest problem is audio feedback, if the laptop and pi are close to one another.  I havent even begin to think about this, but the coolest things to note are:

  • You get a silky-smooth h264 video
  • The audio is acceptable
  • It works almost entirely using gstreamer.  The cool thing about that is gtreamer has a very easy programmatic API.  So… that makes my job easy when I get to that part of my project.

Enjoy!